Waypoints
Waypoints let you mark specific locations on your map so you can keep track of them or find your way back to them later.
Death waypoints are created automatically when you die, so you can return to collect your items. Death waypoints can be disabled in the settings manager if you prefer.
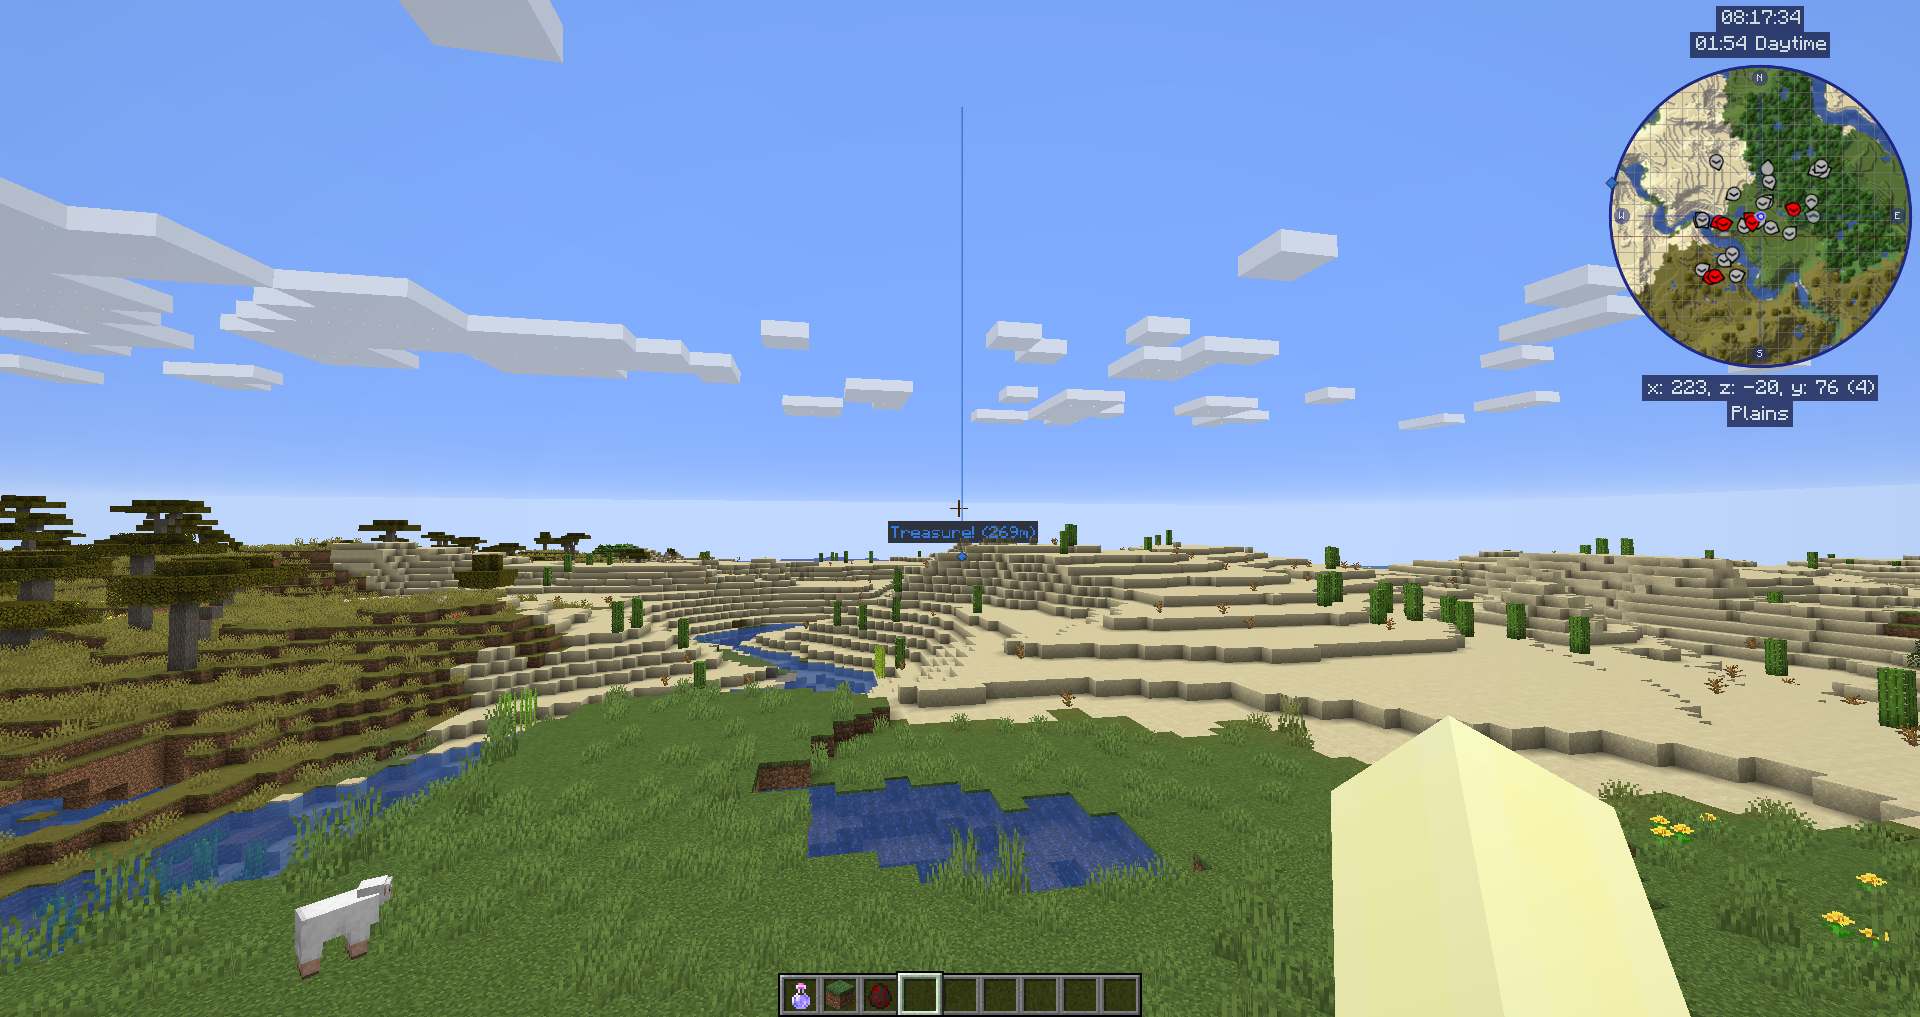
By default a waypoint is shown in the world as a colored beacon beam, with its name and icon displayed when you look towards it. This and many other behaviors can be changed in the Waypoint settings and Waypoint Beacon settings.
Creating Waypoints
You can create a waypoint in any of these ways:
- Press B in-game to create a waypoint where you are standing.
- Double-click, or press B, in the full-screen map to create a waypoint at the cursor.
- Open the Waypoint Manager and use the New button.
Each method opens the Waypoint Editor so you can name and customize the waypoint before saving it.
The Waypoint Manager
The Waypoint Manager is a single place to manage all of your waypoints and waypoint groups. Open it in either of these ways:
- Press N in-game or on the full-screen map.
- Open the full-screen map and click the Waypoint Manager button.
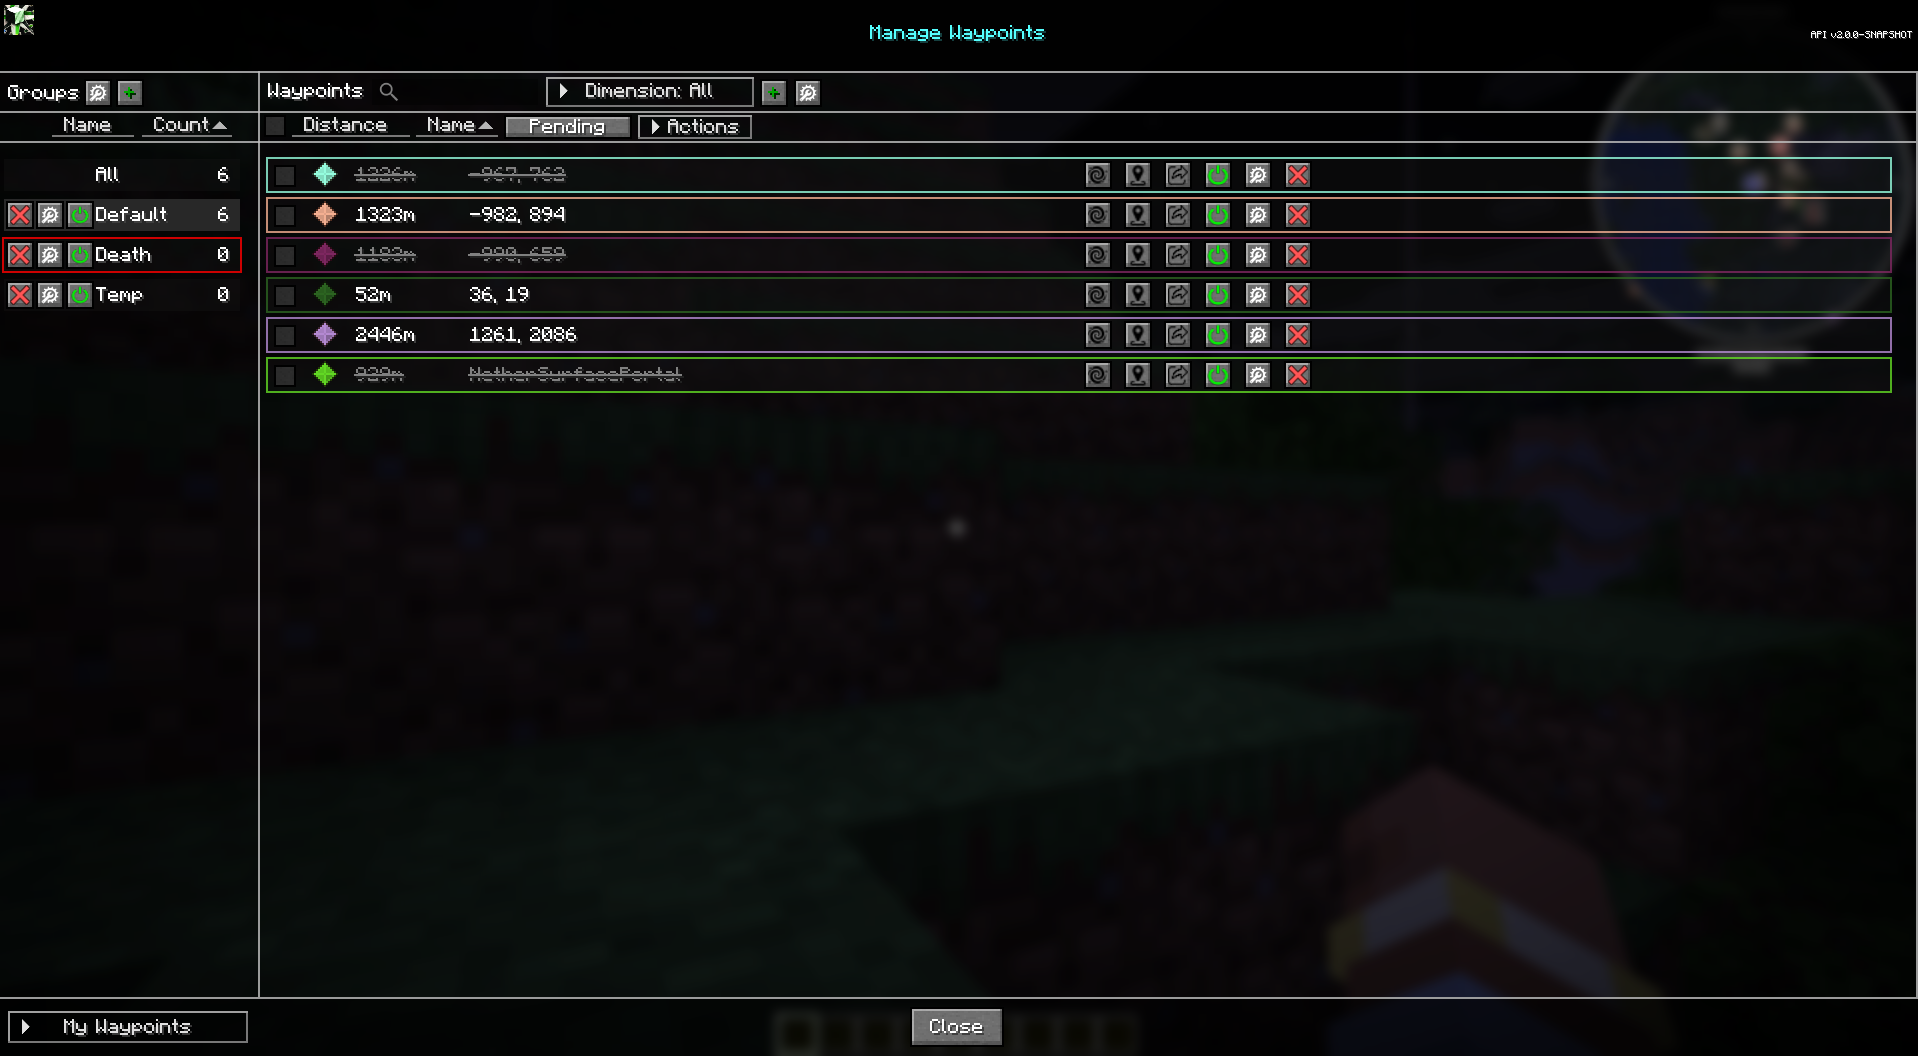
The manager has two panels: a list of groups on one side and the waypoints in the selected group on the other. A search box filters the list as you type.
Manager buttons
| Button | Action |
|---|---|
| New | Create a new waypoint. |
| New Group | Create a new waypoint group. |
| Options | Open the settings manager. |
| Dimension | Filter the shown waypoints by dimension. |
| Import External | Import waypoints from Xaero's Minimap. Only appears when Xaero's waypoints are detected for your current world - see Importing from Xaero's Minimap. |
| Export | Export your waypoints to a file (you choose the format). |
| Pending | Review waypoints other players have shared with you. |
| Close | Close the Waypoint Manager. |
To import or restore JourneyMap's own waypoint files (a dropped-in
.dat, or a backup), see Backups and Importing
below - that is separate from the Import External button.
Per-waypoint actions
Each waypoint in the list has these actions:
- Teleport - if allowed by the server, teleport directly to the waypoint.
- Find - locate the waypoint on the full-screen map.
- On/Off - toggle the waypoint's visibility.
- Edit - open the Waypoint Editor.
- Remove - delete the waypoint.
- Chat - share the waypoint (see Sharing Waypoints).
Selecting multiple waypoints
Use Select All, or select individual waypoints, to act on several at once. With a selection active you can Toggle Selected, Share Selected, or Delete Selected.
The Waypoint Editor
The Waypoint Editor opens whenever you create or edit a waypoint.
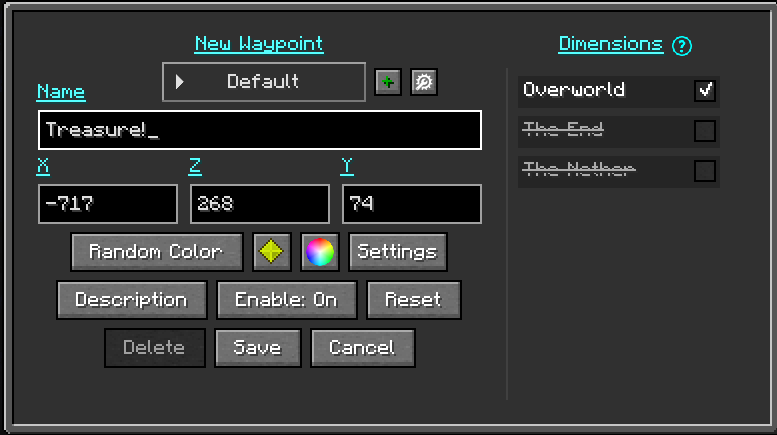
The editor provides these fields:
- Name - the display name for the waypoint.
- Location - the X, Y, and Z coordinates. You can switch between
separate X / Y / Z fields and a single combined
X, Y, Zfield using the Coordinate Layout option (see below). A Sync checkbox next to the Y field, when enabled, fills the Y value from the cached surface height for that X/Z (if that chunk has been mapped), so the waypoint sits on the surface. - Dimensions - toggles for the dimensions the waypoint is shown in.
- Group - the group this waypoint belongs to. You can also create a new group from here.
- Enable - whether the waypoint is enabled and visible.
- Color - the waypoint's color. Click the color wheel to pick a color, or use Randomize for a new random color. This sets the icon, beacon, and label colors together; to set them separately, use the Settings popup.
- Icon - click the icon button to choose the waypoint's icon. See Waypoint Icons.
- Settings - opens the Waypoint Settings popup, where you can set the icon, beacon, and label colors individually and choose where the waypoint is shown.
- Description - opens a popup for a longer free-text description.
Buttons:
- Reset - undo your unsaved edits to this waypoint.
- Save - save your changes.
- Close - close the editor without saving.
Editor options
The Waypoint Editor Options button configures the editor itself
rather than a single waypoint. It includes the Coordinate Layout
option, which switches between separate X / Y / Z input fields and a
single combined X, Y, Z field.
The Waypoint Settings popup
The Settings button in the editor opens the Waypoint Settings popup, which controls the waypoint's colors and where it is shown.
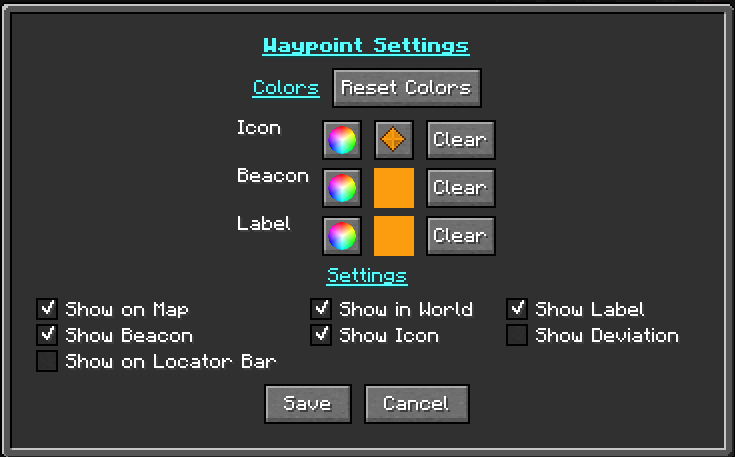
Colors. The popup has a four-row color table - Icon, Icon Color, Beacon, and Label:
- The Icon row has an icon button for choosing the icon, along with a color picker.
- The Icon Color, Beacon, and Label rows each have a color picker for that element.
- The Icon Color, Beacon, and Label colors follow the icon's color until you set them individually, so by default they match.
- Each row's Clear button removes that color, drawing the element with no tint.
- Reset Colors returns all rows to the icon's color.
Visibility. A column of checkboxes controls where the waypoint is shown:
| Toggle | Effect |
|---|---|
| Show on Map | Show the waypoint on the minimap and full-screen map. |
| Show in World | Show the waypoint in the world. |
| Show Label | Show the waypoint's name label. |
| Show Beacon | Show the in-world beacon beam. |
| Show Icon | Show the waypoint's icon. |
| Show Deviation | Show the deviation readout next to the label. |
| Show on Locator Bar | Show the waypoint on the vanilla locator bar. |
The Show on Locator Bar toggle is only present in JourneyMap for Minecraft 26.1 and newer (see Show On Locator Bar).
Waypoint Groups
Waypoint groups let you organize waypoints into named sets - for example
Bases, Mining, or Villages. A group can be enabled or disabled as
a whole, given its own icon, and marked as the default group for new
waypoints.
JourneyMap has several built-in groups: Default (where new waypoints
go unless you choose otherwise), Death (death waypoints), and Temp
(temporary waypoints). The All view shows every waypoint regardless of
group.
More detail
Groups are a large feature with their own management screen. Full coverage lives on the Waypoint Groups page.
Waypoint Icons
Click the icon button in the Waypoint Editor (or in the Icon row of the Settings popup) to open the icon picker.
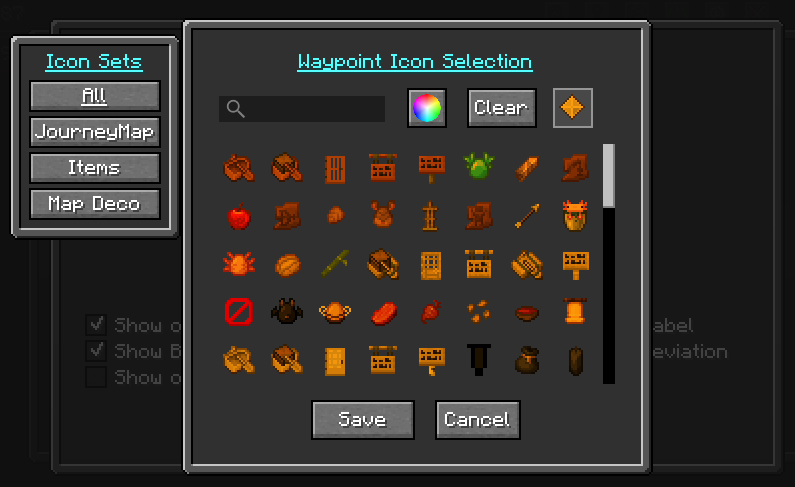
The picker groups icons into tabs:
- All - every available icon.
- JourneyMap - the built-in JourneyMap icons.
- Minecraft - vanilla Minecraft item textures.
- Map Deco - vanilla map marker icons.
- One tab for each named icon set supplied by a resource pack.
The picker also has a color picker, so you can set the icon's color while choosing it, and a Clear button to remove the color.
You can add your own waypoint icons, and your own named icon sets, with a resource pack. See Waypoint Icons (Resource Packs).
Server-Managed Waypoints
When you play on a server that runs JourneyMap, the server can manage waypoints itself. In that case waypoints have a scope:
- Personal - your own waypoints, visible only to you.
- Global - waypoints managed by the server and shared with players, set up by server admins.
The Waypoint Manager shows a scope selector when server-managed waypoints are available. See Server Multiplayer settings for the server-side options.
Teleporting to Waypoints
If the server allows it, the Teleport action in the Waypoint Manager takes you directly to a waypoint. Teleporting is controlled per dimension by server admins, so it may be available in some dimensions and not others. In single-player it is always available.
The teleport command JourneyMap uses can be customized, and there is an option to strip decimal places from the coordinates it sends. See the Waypoint settings.
Sharing Waypoints
You can share a waypoint or location with other players. Players who do not have JourneyMap still see the location in chat in a readable format.
There are three ways to share:
- In the Waypoint Manager, use the Chat button next to a waypoint (or Share Selected for several). The location is placed in the chat input for you - add a message if you like, then press Enter.
- In the chat input, type
/jm ~and press Enter. It is replaced with your current location. - Type a location manually in chat between square brackets (see Location Format below).
When a properly formatted location appears in chat, click it to create a waypoint, or control-click it to view the location on the full-screen map.

Waypoints shared directly with you arrive as Pending waypoints. Open the Pending button in the Waypoint Manager to Accept or Decline each one.
Location Format
A location must have at least the x and z coordinates. The order of the values does not matter:
[x:#, z:#][x:#, y:#, z:#][x:#, y:#, z:#, dim:#][x:#, y:#, z:#, dim:#, name:text][name:text, dim:#, x:#, z:#, y:#]
A location is two or more name:value pairs separated by commas. The
supported values are:
x(integer) requiredy(integer)z(integer) requireddim(integer)name(string, no quotes, no commas)
Waypoint Commands
JourneyMap's chat commands live under the /jm prefix.
/jm reload reloads the waypoint files from disk without restarting the
game. This is mainly useful after dropping waypoint files into the
waypoint folder while the game is running.
When the server runs JourneyMap, server-side waypoint commands are also
available under /jm waypoint (or /jm wp). See the
server waypoint command page.
Backups and Importing
JourneyMap protects your waypoint data in several ways:
- Rolling backups - JourneyMap keeps recent backups of your waypoint data and automatically loads the most recent good backup if the main file is found to be damaged.
- Import / Export - use the Import and Export buttons in the Waypoint Manager to back up your waypoints to a file or restore them.
- Drop-in merge - drop a waypoint
.datfile into the waypoint folder and JourneyMap merges its waypoints into your existing data. Run/jm reload, or reconnect, to pick up files added while playing. - Import from Xaero's - if Xaero's Minimap waypoints are detected for your current world, an Import External button appears in the Waypoint Manager. See Importing from Xaero's Minimap.
Importing from Xaero's Minimap
JourneyMap can import waypoints from Xaero's Minimap, currently the only supported external source. The Import External button appears in the Waypoint Manager toolbar only when JourneyMap detects Xaero's waypoints for the world or server you are on; if there are none for the current world, the button is hidden.

Clicking it opens the Import External Waypoints screen, where you can review the detected waypoints and import them. JourneyMap reads Xaero's own data folder, matching by singleplayer world, server address, or Realm.
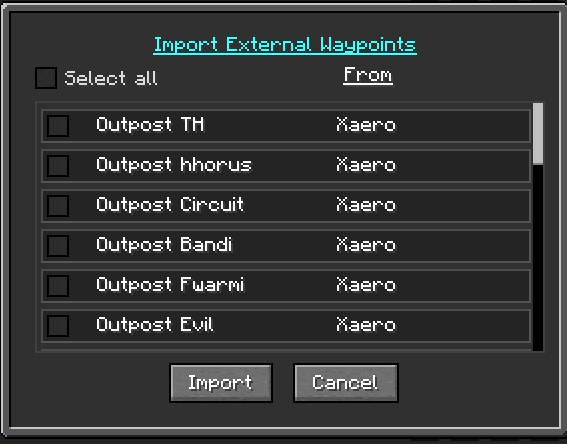
This is separate from the
Import / Export data tools and from
the drop-in .dat merge above: those handle JourneyMap's own files,
while this reads Xaero's.
Show On Locator Bar
26.1 and newer
The locator bar is a Minecraft 1.21.6+ feature, so this option is only present in JourneyMap for Minecraft 26.1 and newer (the 26.x line, including 26.2). It is not available on the 1.21.1 line (1.21.1 / 1.21.11).
Waypoints can be shown on Minecraft's locator bar. This is controlled by a Show On Locator Bar option, available both globally and per group. Disabled waypoints are not shown on the locator bar.

Settings
Waypoint behavior is configured in two settings categories:
- Waypoint settings - death waypoints, the teleport command, sharing, and more.
- Waypoint Beacon settings - how waypoint beacons and labels are drawn in the world.